Intro to Website Design
Website Design and Development will use 3 different coding languages; HTML, CSS and JavaScript. Each have their own purpose and use case.
Recommended sites:
I would recommend downloading Notepad++ at home so you can practice your website development skills out of school. Download from here: Notepad++ (Windows OS only).
If you own a Mac (Apple laptop or desktop) that runs MacOS then you will need to use an alternative - recommended is SublimeText or TextMate.
Analysis
Before we start writing HTML, CSS and JavaScript, we must first understand exactly what it is we are being asked to create. This step analyses the requirements of the website and allows us to plan ahead as to how our website will look, work and function
End-user Requirements
The end user requirements are features or facilities of the website that the user should be able to access. For example, an end user requirement of the website Youtube would be that the user should be able to watch videos. Another example; an end user requirement for the website Amazon is that the user should be able to search, find and buy a product.
Functional Requirements
A functional requirement can be thought of as 'why has the website been created?' if we look at YouTube as an example again, we can say that they functional requirement is that the website should display videos
Design
During the design stage you will be expected to describe, exemplify and implement; visual layouts (wireframes), navigation structure, consistency of web pages and any underlying processes. You will also be expected to read and understand
Navigational Structure
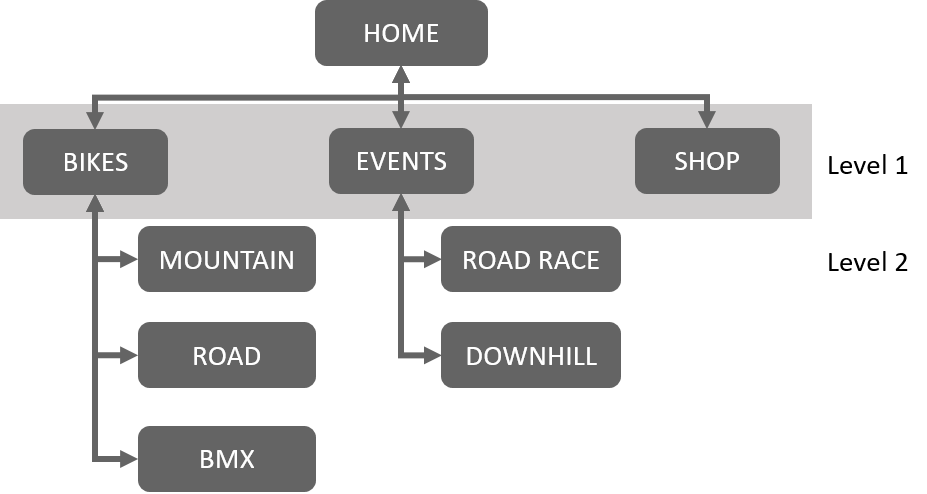
At Higher level, we expand on the N5 diagram to show a multi-level website as well as highlighting the level for pages. You can see in the example below that the first set of pages is considered level 1, this is also the navigation that the user will see on the homepage. The subpages of level 1 are therefore level 2.
Wireframes
Wireframes are used to plan the final layout of the webpages in the website. They are usually done with pencil and paper to sketch out a brief design, but can do be done digitally. At higher you will be expected to produce wireframes for both a website/webpage and a form.
- the indented layout of the page
- the position of:
- navigational bars/links
- all text elements on the page
- media elements (including file format)
- elements that allow a user to interact
- form inputs
- hyperlinks (including types)
Sometimes wireframes may also include annotations that specify:
- background colour
- text font
- text size
- text alignment
- text colour
- the size of any images e.g 150 x 200 pixels
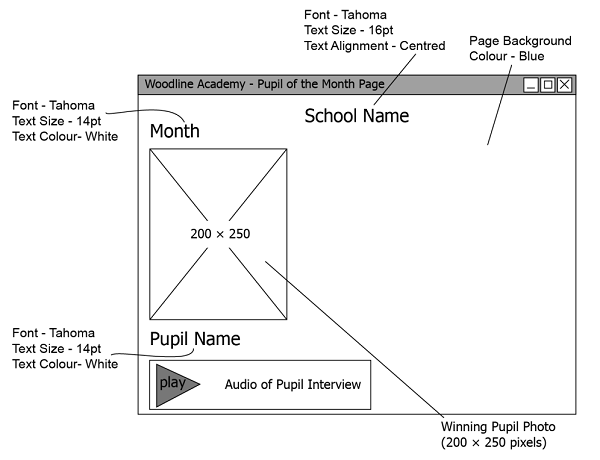
Here is an example of a wireframe for a webpage:
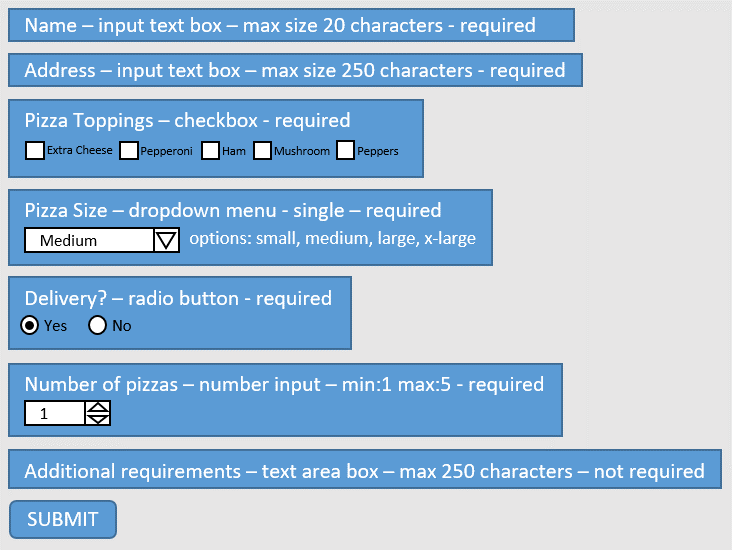
Here is an example of a wireframe for a form:
Implementation
HTML
At Advanced Higher level you will be expected to know HTML from Higher level as well as PHP + MySQL and CSS Media Queries.
HTML5 Page Structure
There are 5 new tags that you need to be aware of for WDD in Higher;
- <header> - This contains elements that will appear at the top of every page eg. a title, banner and logo.
- <nav> - This is where the navigation links/buttons will go
- <main> - This is where the main content of the webpage will go
- <section> - Sections are used within the main tags to define certain sections of the page
- <footer> - The footer will usually contain information about the website such as contact and legal info.
HTML Tag List
Below is a list of HTML tags and what they are used for. It isn't a complete list, but a comprehensive list of all the HTML tags that you will be expected to know for Computing Science N5 and Higher. [Click the table header to collapse the table]
| Tag: | Definition: |
|---|---|
| <a> | Defines a hyperlink |
| <audio> | Defines sound content |
| <b> | Defines bold text |
| <body> | Defines the document's body |
| <br> | Defines a single line break |
| <button> | Defines a clickable button |
| <code> | Defines a piece of computer code |
| <col> | Specifies column properties for each column within a <colgroup> element |
| <div> | Defines a section in a document |
| <footer> | Defines a footer for a document or section |
| <form> | Defines an HTML form for user input |
| <h1> to <h6> | Defines HTML headings |
| <head> | Defines information about the document |
| <header> | Defines a header for a document or section |
| <html> | Defines the root of an HTML document |
| <img> | Defines an image |
| <input> | Defines an input control |
| <label> | Defines a label for an <input> element |
| <li> | Defines a list item |
| <link> | Defines the relationship between a document and an external resource |
| <main> | Specifies the main content of a document |
| <nav> | Defines navigation links |
| <ol> | Defines an ordered list |
| <option> | Defines an option in a drop-down list |
| <p> | Defines a paragraph |
| <script> | Defines a client-side script - usally JavaScript |
| <section> | Defines a section in a document |
| <select> | Defines a drop-down list |
| <source> | Defines multiple media resources for media elements (<video> and <audio>) |
| <strong> | Defines important text |
| <style> | Defines style information for a document |
| <sub> | Defines subscripted text |
| <sup> | Defines superscripted text |
| <table> | Defines a table |
| <td> | Defines a cell in a table |
| <textarea> | Defines a multiline input control (text area) |
| <th> | Defines a header cell in a table |
| <time> | Defines a date/time |
| <title> | Defines a title for the document |
| <tr> | Defines a row in a table |
| <u> | Defines text that should be stylistically different from normal text |
| <ul> | Defines an unordered list |
| <video> | Defines a video or movie |
PHP
PHP is used to create dynamic, database driven websites where the code is executed server side and delivers data to individual users.
Since PHP is serverside scripting, we need to install a program that can simulate a client and server setup. To do this we will be using XAMPP.
Click here to view a guide to setting up XAMPP
Some PHP basics
All of our PHP code will need to sit in between a PHP tag. And to create a variable in PHP we must start the variable name with a dollar sign $;
<?php
	$name = 'Steven';
?>
Previous programming concepts will also be used in PHP;
<?php
	//Fixed Loop
	for($i = 1; $i <= 10; $i++)
	{
		echo $i;
	}
	//While Loop
	$i = 1;
	while ($i <= 10){
		echo $i++;
	}
	//Conditional Statements
	$a = 10;
	$b = 8;
	if ($a > $b){
		echo "a is bigger than b";
	}
?>
You may have noticed a command in the previous code called echo. This is how we print data on the webpage for the client to see.
Connecting to a Database
To connect a php file to a database we need 4 pieces of data;
- Host
- Username
- Password
- Database Name
$server = 'localhost';
$user = 'root';
$password = '';
$database = 'bookingdb';
Now we can create a connection to the database and feedback if the connection was unsuccessful.
//Connect to server with above variables
$connection = mysqli_connect($server,$user,$password,$database);

//If error with connection, print error
if (mysqli_connect_errno())
{
	echo "Failed to connect to MySQL Database: ".mysqli_connect_error();
	//and kill the script
	die();
}
Now we have our php file connected to the database, we can start to execute queries (using SQL) to retrieve data to display to the user. Here we want every record to be returned so our SQL statement reflects this. We then use mysqli_num_row function to check if the number of rows in the return array is 0, if it is we print a message saying so.
//Setup variable with query string
$querystring = "SELECT * FROM vehicles";

//Setup variable to be the return data from executing the query (passing in connection and query variable)
$allData = mysqli_query($connection, $querystring);

//Create an if statement to display IF there was no results returned from the query
if(mysqli_num_rows($allData) == 0){
	echo "No results";
}
Now we can display the data from the query using a while loop to iterate through the $allData array and pull each item out at during each iteration (storing this data in $row variable), and because the array contains each record from the table, it also includes all pieces of data in each row so we can specify which column of data we want to display;
echo "<table><tr><th>Make</th><th>Model</th><th>Year</th>";
while($row=mysqli_fetch_array($allData)){
	echo "<tr>";
	echo "<td>".$row['make']."</td>";
	echo "<td>".$row['model']."</td>";
	echo "<td>".$row['year']."</td>";
	echo "</tr>";
}
echo "</table>";
In the code above I am using echo on multiple lines to build a HTML table, insert a row and then insert 3 cells using the data from the array. The HTML is written in quotes, and the PHP is concatenated using a period.
PHP Queries
Since we are connecting to a database we can use SQL to perform queries on the data stored in our databases/tables. This is
Fetching Data
We can use queries, as previously seen, to fetch any data from a database.
SELECT * FROM vehicles
There will be situations where you don't want to select EVERYTHING from the database/table and instead just reutrn back some records based on criteria. This is where the WHERE clause will come in
SELECT * FROM vehicles WHERE year > 1990
The code above will select all records where the year column value is greater than 1990 - returning back all vehicles made in the years 1990 and beyond.
Inserting Data
We can also take data from the client and insert them into the database - an example would be someone signing up to a website and creating their own account. We would take credentials such as name, email address and password and put them into a table in our database that contains all of the registered users.
INSERT INTO usersTable(firstName, surname, email, password) VALUES('$firstName','$surname','$email','$password')
CSS
CSS - Cascading Style Sheet is the language that adds style and design to the websites. On top of what you learned in N5 WDD, you will be controlling more of the websites design from external CSS.
Basic CSS
Basic CSS example to give the body a background colour, and style every paragraph tag with font family, font size and colour.
body{
	background-color:blue;
}

p{
	font-family:Arial;
	font-size:23px;
	color:white;
}
The above will make any text in a <p> tag have the font of Arial, 23px font size and be white in colour. The entire body of the webpage will have a blue background.
Grouping and Descendant Selectors
At Higher we will be expected to use Grouping and Descendant CSS selectors.
Grouping Selector
Grouping selectors allows us to reuse the same CSS rules for multiple elements. In the example below I want to apply 2 rules; padding and margin-top, to 4 different tags, main, nav, footer and header, at once. I simply name my tags I want to apply the rule to, and place a comma between each one.
nav, main, footer, header{
	padding:5px;
	margin-top:5px;
}
Descendant Selector
Descendant selectors are used to reduce the need for ID's and class' by targetting tags within tags. For example; if we have a webpage that has lots of div's and inside those div's we have a h3 tag, we could use descendant selector CSS to target only the h3 tags that are inside a div.
div h3{
	color:blue;
	text-decoration:underline;
}
Another scenario would be if I had a nav bar that had an unordered list in and I wanted to style the individual list items a specific way, I would use descendant selectors to target only the <li> tag found inside an <nav> tag.
nav ul li{
	color:blue;
	list-style-type:none;
}
Controlling Appearance
CSS has a property that allows us to control how an element appears on the page. This property is called display. You should be aware of 3 of its values; block, inline and none.
display:block
The border indicates the space this div will take up when the display property is set to block
display:inline
The border indicates the space this div will take up when the display property is set to inline
display:none
When the display property is set to block, no element can be positioned to the side of it.
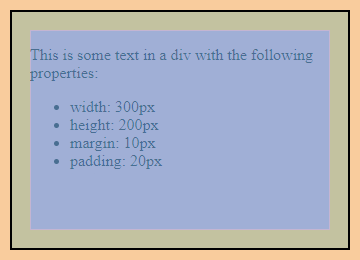
Controlling Spacing
We can control the distance between elements using margins and padding
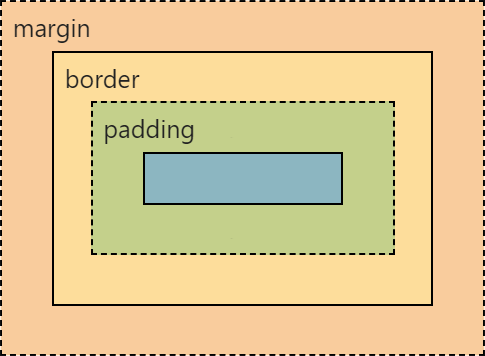
Margin will control the spacing between elements, where as padding will control the spacing of elements within an element, for example text within a div
Controlling Layout
We can use float property in CSS to control how an element sits. We have 2 properties that we need to know and use; left and right. But we also have another property that works along with float and that is clear. It only has 1 property you will likely need to use; both.
Switch between the float options below and then trigger clear:both on or off to see the impact
Cascading Style Sheets (CSS) is a style sheet language used for describing the presentation of a document written in a markup language such as HTML. CSS is a cornerstone technology of the World Wide Web, alongside HTML and JavaScript.
CSS Rules
Here is a list of ways you will be expected to use CSS for Website Design and Development. Click the heading to hide the table.
Higher |
||
| Property | Effect | Example |
|---|---|---|
| margin | Margin is used to push an element away from another | margin:10px |
| padding | Padding pushes content from the edge of the element it is in | padding:5px |
| display | Display will control how an element appears on the page | display:none display:block display:inline |
| float | Float is used to change how elements sit with other elements | float:left float:right |
| clear | Clear will control how the float impacts another element | clear:left clear:right clear:both |
| list-style-type | This is a specific css rule to change how unordered lists appear | list-style-type:none list-style-type:disc list-style-type:square |
Here is a comprehensive list of CSS tags that we might be expected to use in Higher Computing Science Website Design and Development:
| Tag: | Definition: |
|---|---|
| align-content | Specifies the alignment between the lines inside a flexible container when the items do not use all available space |
| align-items | Specifies the alignment for items inside a flexible container |
| background-attachment | Sets whether a background image scrolls with the rest of the page, or is fixed |
| background-color | Specifies the background color of an element |
| border | A shorthand property for border-width, border-style and border-color |
| border-collapse | Sets whether table borders should collapse into a single border or be separated |
| border-color | Sets the color of the four borders |
| border-radius | A shorthand property for the four border-*-radius properties |
| border-spacing | Sets the distance between the borders of adjacent cells |
| border-style | Sets the style of the four borders |
| bottom | Sets the elements position, from the bottom of its parent element |
| clear | Specifies on which sides of an element floating elements are not allowed to float |
| color | Sets the color of text |
| display | Specifies how a certain HTML element should be displayed |
| float | Specifies whether or not a box should float |
| font | A shorthand property for the font-style, font-variant, font-weight, font-size/line-height, and the font-family properties |
| font-family | Specifies the font family for text |
| font-size | Specifies the font size of text |
| font-weight | Specifies the weight of a font |
| height | Sets the height of an element |
| left | Specifies the left position of a positioned element |
| line-height | Sets the line height |
| list-style-type | Specifies the type of list-item marker |
| margin | Sets all the margin properties in one declaration |
| margin-bottom | Sets the bottom margin of an element |
| margin-left | Sets the left margin of an element |
| margin-right | Sets the right margin of an element |
| margin-top | Sets the top margin of an element |
| opacity | Sets the opacity level for an element |
| order | Sets the order of the flexible item, relative to the rest |
| outline | A shorthand property for the outline-width, outline-style, and the outline-color properties |
| outline-color | Sets the color of an outline |
| outline-style | Sets the style of an outline |
| outline-width | Sets the width of an outline |
| overflow | Specifies what happens if content overflows an element's box |
| overflow-wrap | Specifies whether or not the browser may break lines within words in order to prevent overflow |
| overflow-x | Specifies whether or not to clip the left/right edges of the content, if it overflows the element's content area |
| overflow-y | Specifies whether or not to clip the top/bottom edges of the content, if it overflows the element's content area |
| padding | A shorthand property for all the padding-* properties |
| padding-bottom | Sets the bottom padding of an element |
| padding-left | Sets the left padding of an element |
| padding-right | Sets the right padding of an element |
| padding-top | Sets the top padding of an element |
| position | Specifies the type of positioning method used for an element (static, relative, absolute or fixed) |
| right | Specifies the right position of a positioned element |
| text-align | Specifies the horizontal alignment of text |
| text-indent | Specifies the indentation of the first line in a text-block |
| text-justify | Specifies the justification method used when text-align is "justify" |
| text-orientation | Defines the orientation of the text in a line |
| text-overflow | Specifies what should happen when text overflows the containing element |
| top | Specifies the top position of a positioned element |
| vertical-align | Sets the vertical alignment of an element |
| visibility | Specifies whether or not an element is visible |
| white-space | Specifies how white-space inside an element is handled |
| width | Sets the width of an element |
| word-wrap | Allows long, unbreakable words to be broken and wrap to the next line |
JavaScript
JavaScript is the language that adds interactivity and dynamic elements to the websites.
For example, move your mouse over the text below and then move your mouse off - notice the change?
EXAMPLE JAVASCRIPT
At Higher you will be expected to implement JavaScript using any or all 3 mouse events; onmouseover, onmouseout, and onclick. These events are placed inside the HTML element tag.
<h3 onClick="____">Click Me</h3>
<h3 onmouseover="____" onmouseout="____" >Hover your mouse over me</h3>
What goes inside the quotes is either a function or JavaScript itself. It is cleaner to put a call to a function that we define in <script> tags that sit inside the <head> tag.
<head>
	<script>
		function changeToRed(){
			document.getElementById("target").style.color="red";
		}
	</script>
</head>
<h3 onClick="changeToRed()">Click Me</h3>
All of our JavaScript should go in the script tags
JavaScript Examples
Image Change
Change an image when we move our mouse over then return the image back to the original when the mouse moves off.

function imgA(){
			document.getElementById("imgChange").src = "../images/js_imgA.png";
		}

		function imgB(){
			document.getElementById("imgChange").src = "../images/js_imgB.png";
		}
Image Size
Increase image size when we move our mouse over it, return the image back to the original size when mouse moves off the image.
Image Reveal Text
We can show and hide text when we click an element
JavaScript is a programming language that is one of the core technologies of the World Wide Web, alongside HTML and CSS.
Text Effect
JavaScript can also affect text. Hover your mouse over the following text:
This text can be made bold when the user hovers their mouse over, and then returns back to normal weight when the mouse moves off.
Image Reveal
onClick applied to a piece of text to reveal a relevant image.
- Pizza
- Burger
- Fries